Every Smart TV has WiFi support by default. But sometimes, you may experience connectivity issues while using WiFi. Likewise, JVC Smart TV has trouble connecting to the WiFi network sometimes due to some errors. You can fix these errors by following some of the troubleshooting methods available for Smart TVs.
Reason for JVC Smart TV Not Connecting to WiFi
There are some common cases where you have WiFi connectivity issues. Some of the common cases are,
Weak WiFi Strength: The WiFi network you are connecting to may not have enough strength. For a long-range connection, you can use the 2.4 GHz network, but it will provide a slower speed. For a short-range connection, you can use the 5 GHz network to get high-speed data.
Router Problem: If the router you use is too old, it may have some performance issues. In this case, you need to buy a new router or repair the existing router.
TV Problem: The JVC Smart TV might have software issues. If you are using the older firmware on your JVC Smart TV, this type of issue will occur. Always update your JVC Smart TV to its latest version to fix the issue. If you still have issues with the WiFi, follow the below fixes one by one to solve the issue.
Power Cycle JVC TV
Power cycling is the concept of turning off and on a device. By doing this, you can clear any temporary errors on your device. Likewise, power cycling the JVC Smart TV can clear any errors that stop the TV from connecting to WiFi.
1: Using your TV remote, turn off the TV.
2: After turning it off, plug out the power cable of the TV from the power socket.
3: Let the TV be idle for 5 minutes.
4: After 5 minutes, plug the cable back into the power socket and turn on the TV.
5: Now, try connecting the JVC TV to WiFi to see whether the fix has worked. If not, go to the next fix.
Update JVC Smart TV
You can experience these WiFi errors if your TV lacks firmware updates. To fix this and to connect WiFi to your JVC Smart TV, you can update the TV software.
1: Press the Home button on your TV remote.
2: Now, on the TV screen, select the Settings option.
3: In the list of options, select the Support option.
4: Under the Support section, select Software Update.
5: Choose the Update TV Software button.
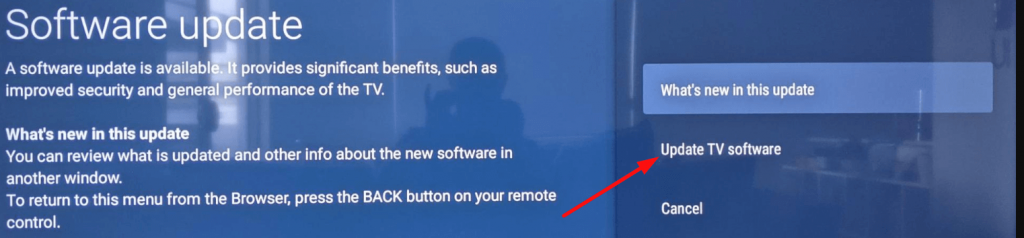
6: After finishing updating, try connecting the WiFi to your JVC Smart TV to check whether the fix has worked.
7: If you still have the issue, restart the router.
Restart WiFi Router
If your WiFi router is constantly working for weeks, it may get errors, and it may have performance issues. This might be one of the reasons for your JVC TV not connecting to WiFi. To fix this issue, you can restart your WiFi router.
1: Disconnect all the devices that are connected to your WiFi router.
2: Now, turn off the router by disconnecting the power cable.
3: Wait for a minute and connect the cables to your router. Then, turn on the router.
4: Let the router take a 5-minute time to establish the connection.
5: After this, try connecting your JVC TV and check whether the fix has worked.
6: If it is not working, reset the WiFi network and try again.
Reset WiFi network
Whenever you connect your JVC Smart TV to a WiFi network, the cache files will save the password to connect to the network automatically. But sometimes, the cache files may get corrupted, which might lead to the JVC Smart TV not connecting to the WiFi. To fix this, you can reset the WiFi connection and connect it again.
1: Turn on your TV and press the Home button.
2: Now, select the Settings option.
3: Select the General option from the Settings category.
4: Now, choose the Network option
5: Tap the Reset Network button. This will delete all the existing WiFi networks on your TV.
6: Then, connect to the WiFi network by entering the correct password. The WiFi passwords are case-sensitive. Make sure that you are entering the correct password. If it is not working, go to the next fix.
Place the Router Near Your TV
A WiFi router must be placed in the central spot of the house where everyone can access it in every room. Additionally, if your WiFi router is far from your TV or has many obstacles, it will reduce WiFi strength. This weak WiFi signal may cause your TV to not connect to the WiFi. So, we recommend you place the WiFi router around 5 to 6 feet around the TV for a better connection.
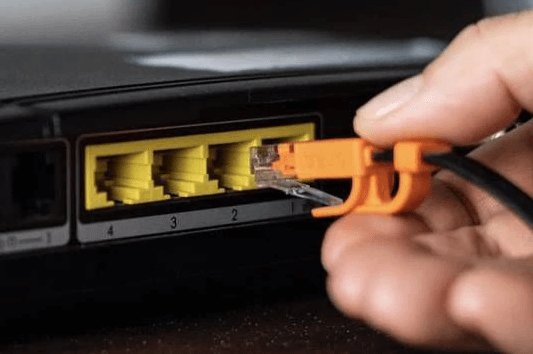
Connect JVC Smart TV to WiFi Using Ethernet Cable
If your JVC TV is not connecting and not performing well with a wireless WiFi connection, then you can connect it using a wired Ethernet cable.

By plugging one end of the Ethernet cable into the back of the TV and the other one into the router, you can connect the TV to the internet. With a wired connection, there will be no network lag and you can get a strong internet connection.
Change WiFi Settings
In the JVC Smart TV, you can manually change the WiFi settings to fix the issue. If WiFi is not working on your JVC Smart TV, you can change the DNS Server address and IP Settings to fix the issue.
1: Go to the Settings menu on your JVC Smart TV.
2: Choose the General option and select Network Settings.
3: Tap the Network Status feature.
4: Choose the IP Settings and change the settings to Obtain Automatically. This will fix the WiFi issue on your TV. If not, change the DNS Settings.
5: Click the DNS Settings option from the IP Settings page.
6: Choose Enter Manually and tap on the DNS Server option.
7: Enter the DNS address as 8.8.8.8 and save the settings.
8: Now, connect your JVC Smart TV to WiFi. If it is not working, you need to reset the JVC Smart TV.
Factory Reset JVC Smart TV
If none of the fixes is working for you, you need to perform the factory reset option. Remember, a factory reset will clear all the data and make your TV fresh and new.
1: Press the Home button on the remote and select the Settings option from the home screen.
2: Select the Device preference option from the Settings menu.
3: Now, select the Reset option.
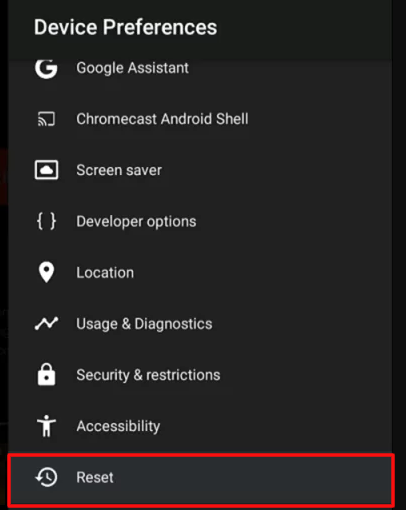
4: In the next step, select the Factory Data Reset option.
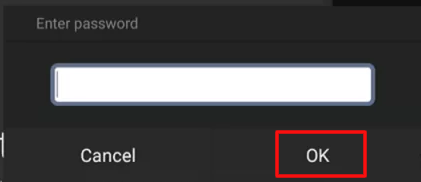
5: Enter the reset password and click the OK button.
6: After resetting, connect the WiFi to your JVC Smart TV.
7: If you still have issues, you need to contact Customer Support.
Contact Support
All the fixes mentioned above are software-related fixes. If the issue is with the hardware, for instance, the WiFi module on your TV may be damaged, or the PCB board on your TV may have some connectivity issues. These hardware issues can’t be fixed by the user. You need to contact JVC Customer Support to fix the hardware issue.
FAQs
To connect WiFi to JVC Roku TV without a remote, you can use the Roku remote or the Remoku extension.